Why I Needed a DIY Sprayer Cart for My 15-Gallon Spot Sprayer
Let me tell you why this whole project started: I got tired of dragging my sprayer around like it was a stubborn dog on a leash. The GREENWOOD 15-Gallon 12V Spot Sprayer from Harbor Freight is a great little machine, but once it’s full of liquid, it gets real heavy. Lifting it, moving it, and trying to keep the hose from tangling turned into a daily frustration.
I needed something simple, sturdy, and mobile—a way to build a DIY sprayer cart that could handle weight, move across rough ground, and not cost me a fortune. A fancy ATV-mounted sprayer setup wasn’t in the budget. I just needed something portable to pull behind me or toss on a trailer and go. That’s when I realized I had an old garden cart frame and a bunch of scrap metal lying around. So I got to work.


The Perfect Budget Sprayer: GREENWOOD 12V 15-Gallon Spot Sprayer
Before diving into the build, let’s talk about the sprayer itself. The GREENWOOD 15-gallon spot sprayer is a battery-powered, 12V electric sprayer that’s ideal for anyone with land, pasture, garden plots, or even just a big backyard. It runs off a 12V battery and has a built-in pump that delivers a solid spray pressure, making it perfect for spraying weeds, fence lines, gravel paths, and more.
It comes with a 15-foot hose, which works okay for smaller areas. But if you’re like me, you’ll eventually want more reach. That’s why I’m planning to extend it to 35 feet, giving me way more flexibility without having to move the cart constantly (we’ll talk about that upgrade soon).
This sprayer has become one of my favorite budget tools—powerful enough for tough jobs, but simple enough for a homeowner to use without complicated setups. If you’re just getting started with spraying and don’t want to overspend, this is a great option.
🔗 Check out DIYHomeWizard’s guide to outdoor tools that are worth every penny if you’re gathering gear for your first major backyard project.
I’m No Welder—But I Know How to Make Things Work
Let me be clear: I’m not some master welder. I don’t have a fancy shop or years of experience stacking perfect weld beads. I’ve got a welder that I know how to turn on, a bunch of scrap, and the mindset to just make it work.
That’s the thing about DIY—you don’t have to be an expert to build something that solves a problem. I figured if I could tack some rebar together and keep the frame square, I could make a cart that would hold up. Was it pretty? No. Was it strong? Absolutely.
That’s the mindset I bring into every project I share on my YouTube channel. Whether it’s fixing something broken or building something new, I figure it out as I go. If that sounds like your kind of project style, you’ll feel right at home here.
🔗 You might also enjoy our article on mounting an outdoor spigot to concrete—another hands-on job that’s easier than people think.


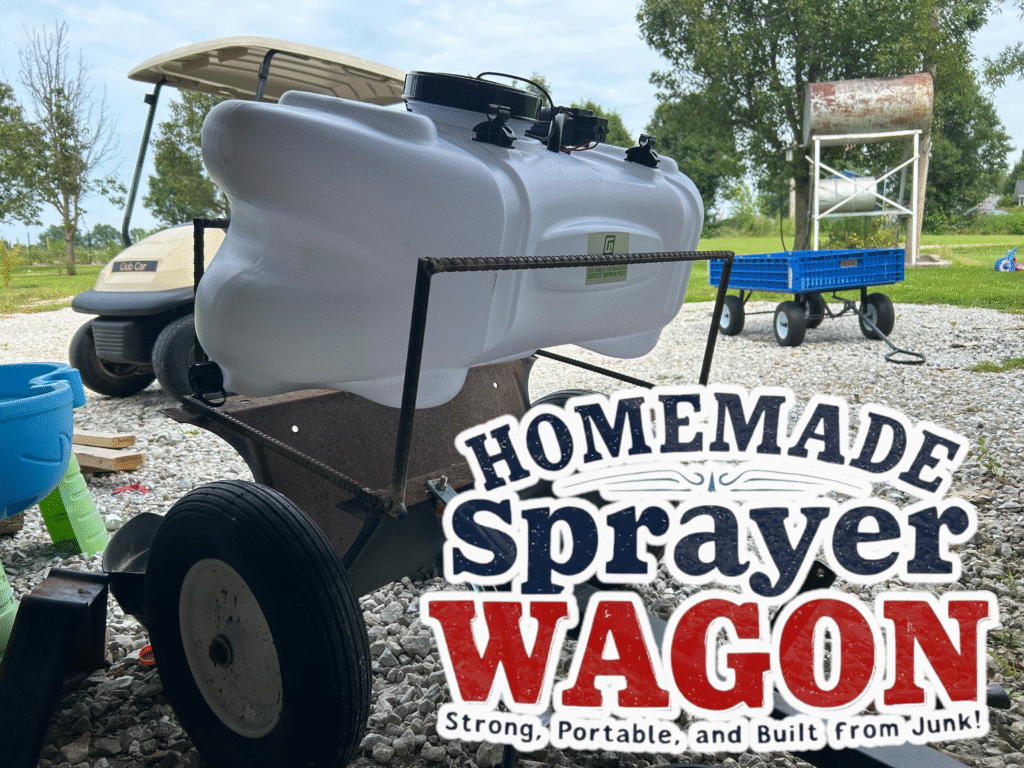
Scrap Metal + Old Garden Cart = New Sprayer Wagon
Now for the fun part: putting this DIY sprayer cart together using nothing but scrap, an old cart base, and a little creative welding.
I started with a rusted-out garden cart frame that had seen better days. The wheels still rolled (kinda), and the bottom support bars were in decent shape. That gave me a strong rolling foundation to build on. I grabbed a bunch of old rebar, angle iron, and tubing I had lying around and got to work designing a custom frame.
The trick was to keep the cart low and stable while still allowing enough room for the 15-gallon sprayer to sit securely without wobbling or tipping. I welded a square frame around the base of the cart, added a rebar support brace across the middle, and created small corner brackets to strap the sprayer down.
Honestly, I eyeballed most of it. I measured once or twice just to be sure things wouldn’t collapse, but this wasn’t some blueprint project. It was about making something functional, not perfect. And that’s the beauty of rebar—it’s forgiving, strong, and dirt cheap.
Mounting the 15-Gallon Spot Sprayer Securely
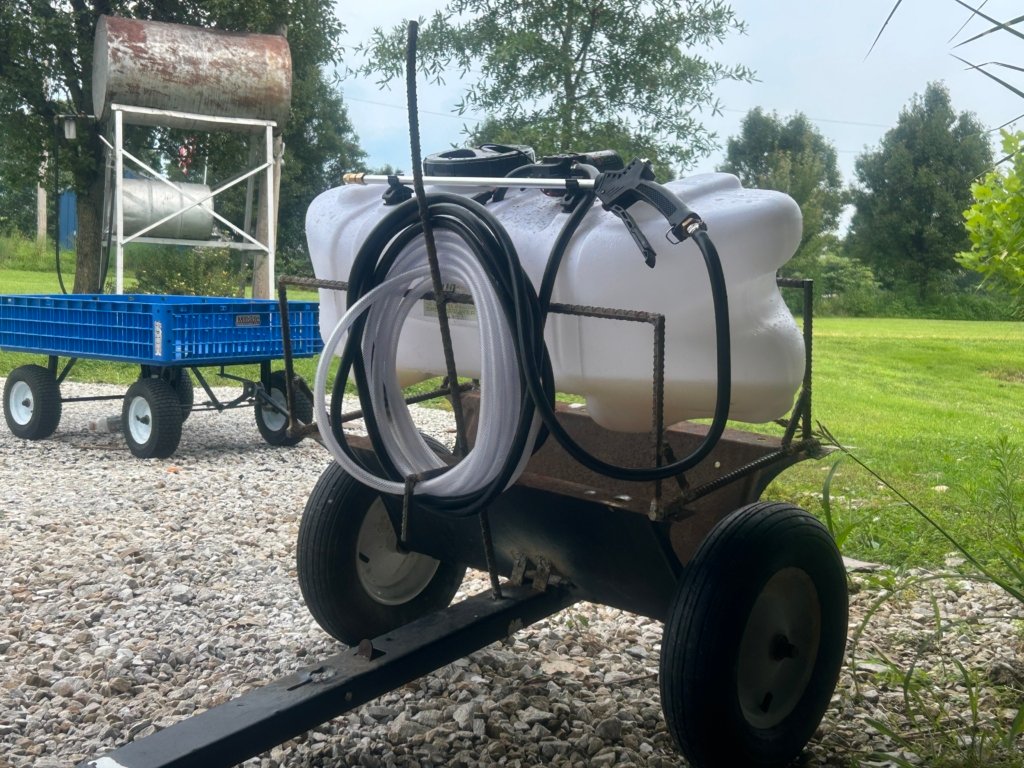
I didn’t mess with straps, rubber padding, or zip ties. I went a different route — something stronger and built to last. I grabbed a pile of old rebar, fired up the welder, and built a custom rectangle-shaped cage right into the cart frame. Think of it like a welded-in dock for the sprayer — it fits down inside it perfectly, snug enough that it doesn’t wobble or tip.
The rebar is spaced and welded in a way that cradles the 15-gallon GREENWOOD sprayer, letting it drop right into place and stay put even when the cart’s rolling over gravel or bumpy grass. The weight of the full tank holds it steady, and the welded cage makes sure it doesn’t shift an inch.
It’s not pretty, but it’s sturdy as hell, and I don’t have to strap or adjust anything every time I use it. I just drop the sprayer in, hook up the hose, and get to work.
Upgrading the Hose from 15ft to 35ft (Even If You Don’t See It in the Video)
Even though you don’t see this in the video, I’m working on a hose upgrade — because let’s be honest, 15 feet just isn’t enough for most yards or garden spaces. I wanted more freedom to move without constantly dragging the cart, so I’m extending the sprayer hose to about 35 feet total.
To do this, I’m using:
- 3/8″ agricultural sprayer hose
- A barbed hose connector with clamps
- The original sprayer hose as the starter lead
This gives me the flexibility to walk around trees, reach fence lines, or spray down the sides of sheds and buildings without moving the cart an inch.
If you’re spraying around a large backyard, fruit trees, or even nursery rows, this kind of setup is a game-changer. On our property, we use a similar setup to treat problem areas around young plants we grow at Weaver Family Farms Nursery, especially when we want to hit the ground around them without damaging their leaves or trunks.
How Well This DIY Sprayer Cart Works in Real Life
I didn’t build this to look nice. I built it to work. And after running it around our property for a few weeks now, I can say it definitely delivers.
The homemade rebar cage keeps the sprayer perfectly locked in, and the heavy-duty frame doesn’t flex or shift when full. I’ve pulled this thing over dirt, gravel, uneven ground, and even some wet patches — no tipping, no drama.
Since the DIY sprayer cart is low to the ground and balanced well over the original cart axle, it doesn’t feel heavy to move. Even with a full 15 gallons, I can roll it by hand with no problem. I usually hook it up to a riding mower if I’m spraying larger spots, but for most jobs, I just pull it by hand with a rope or handle.
This setup works for:
- Spraying driveways, barn sides, or fence posts
- Treating garden paths or rocky areas
- Reaching behind structures or equipment
- Cleaning hard-to-reach spots with water
No issues, no leaks, and best of all — no money wasted on a fancy store-bought cart I didn’t need.


Why You Don’t Need Fancy Tools to Build Something That Works
This entire project proves one big thing: you don’t need perfect tools or high-end gear to build something that gets the job done. I used a basic welder, a grinder, some scrap metal, and a beat-up old garden cart frame that was heading for the trash.
You can do the same thing. Got a pile of metal? Got a welder you barely know how to use? Then you’ve got what it takes to build your own DIY sprayer cart. You’re not aiming for a showroom build — you’re solving a real problem with what you’ve got.
A few tips if you’re just getting started:
- Keep your build square and balanced
- Overbuild it rather than underbuild it
- Don’t chase perfection — chase functionality
🔗 This mindset goes hand-in-hand with other DIY tasks around the house. Like figuring out how to mount an outdoor spigot to concrete — it sounds complicated, but once you just start, it all comes together.
Want to Build Your Own? Here’s What You’ll Need
If you’re ready to build your own DIY sprayer cart, here’s what I used and recommend. You might have different materials on hand, and that’s totally fine — adapt it to fit your tools and setup.
🔧 Materials and Tools:
- GREENWOOD 15-Gallon 12V Sprayer (Harbor Freight or online)
- Old garden cart base with axle and wheels
- Rebar or scrap angle iron for the cage/frame
- Welder (any basic model works)
- Grinder (for cutting and smoothing)
- Measuring tape & marker
- Optional hose extension to reach 35ft+
- 12V battery (for powering the pump)
- Sprayer hose clamps & basic fittings
Build your frame around the tank — not the other way around. That’s what makes it sit snug and stay balanced. You don’t need to follow an exact plan; just work smart and weld solid.
🎥 Want to see the build from start to finish? Watch the full video on my YouTube channel where I walk you through every weld, fit, and fix I made to bring this homemade sprayer cart to life. It’s not fancy, but it works like a charm.