
Why I Ditched Tomato Cages for a DIY Trellis
I’ve used those classic round tomato cages for years. You know the ones—they always tip over, rust out, or completely give up once your plants actually grow like they’re supposed to. So this year, I finally had enough. I decided to run a long, sturdy DIY tomato trellis down the full 50-foot row of our garden, and honestly, I should’ve done it years ago.
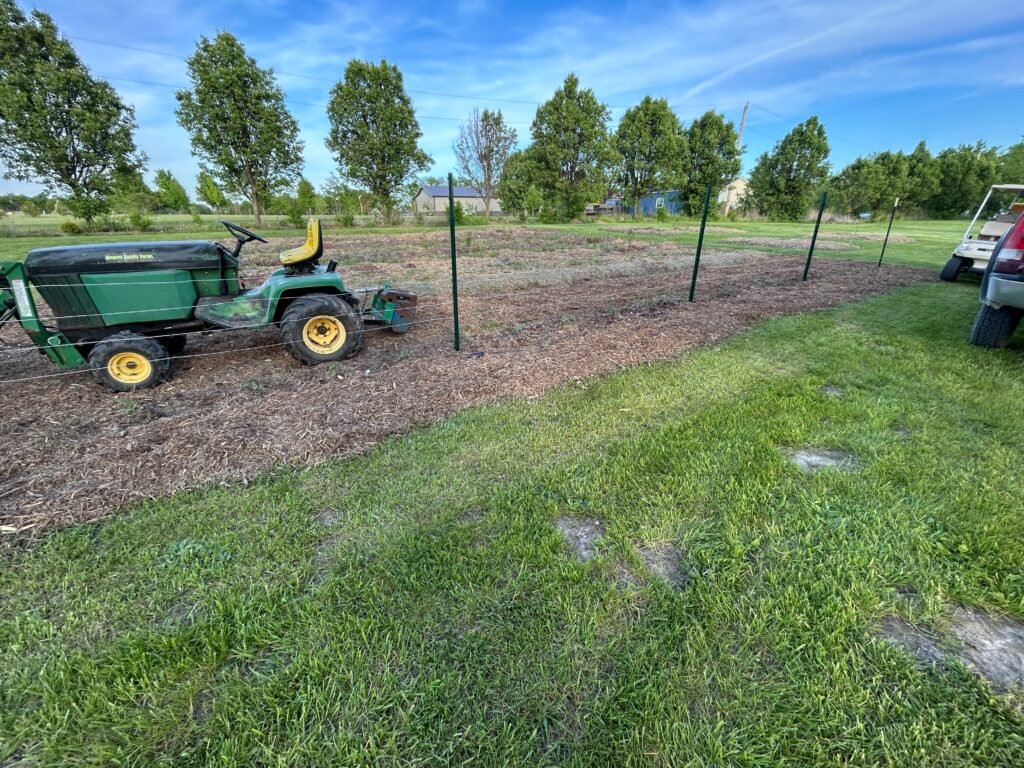
Instead of fighting cages all summer, I used two 7-foot T-posts—one at each end of the row—and added three U-posts in between, spaced evenly. That gave me enough strength on the ends and flexibility in the middle. The U-posts have pre-punched holes, which makes it super easy to thread the wire through and keep it all tight. I used 14-gauge wire, which worked well, but I’ll be honest—if you’ve got access to thicker wire, even better.
If you’re like me and you’ve got a long garden bed to support, this trellis for large tomato rows is a game-changer.
Oh—and if you’re also growing along a gravel driveway like we are, we learned the hard way how to deal with all the dust. You might want to check out the best plants for gravel road dust control—trust me, it makes a huge difference near your veggies.
What You’ll Need to Build This Tomato Trellis
Here’s everything I used for this setup:
- Two 7-foot T-posts – these are the backbone. Pound them deep.
- Three U-posts – space them evenly between the T-posts. They’re lighter but perfect for running wire.
- 14-gauge galvanized wire – strong, weather-resistant, and cheap. A thicker gauge would be even better for heavier varieties.
- A post driver – for driving those posts in without wrecking your back.
- Pliers and wire cutters – for tensioning and trimming your wire.
- A little bit of patience and a good chunk of coffee.
That’s seriously all you need. I ran multiple lines of wire at different heights, threading right through the U-post holes. You can adjust the heights depending on your tomato varieties. The lower line was about a foot off the ground, then another around two feet, and one more up near three feet. That’s where most of the support is needed once they really start growing.
If you’re planting around 50 feet like me, this is the best trellis for tomatoes you can build without blowing your budget.
And if you’re planting more than just tomatoes this year, check out our victory garden layout for families—it works perfectly if you’re aiming to grow more food in less space.
How I Spaced the Posts and Ran the Wire
Once I had the two T-posts driven solidly into the ground—one at each end of the tomato row—I measured the space between them and evenly placed three U-posts along the row. These don’t need to be as deep or as sturdy as the T-posts since they’re mostly there to help guide the wire and give mid-line support.
Each U-post has holes that make running the wire super simple. I chose 14-gauge galvanized wire because it holds up against rust and doesn’t sag much. I ran three lines of wire horizontally across the whole setup—one low (around 12 inches), one in the middle (about 24 inches), and one higher up (around 36–40 inches). That’s plenty for indeterminate tomatoes to be tied off as they grow.
Tension is key here. You want the wire tight enough that it doesn’t sag under the weight of the plants. I pulled it snug with pliers and twisted the ends around the T-posts. The T-posts give strong anchor points, especially at this length. Even with a breeze or heavy fruit, this setup isn’t going anywhere.
If you’re still battling garden layout ideas or wondering how close together to plant everything, I wrote down what works best for us in our article on how close together can I plant my plants. That’ll help you avoid crowding while maximizing every square foot.
Why This Setup Beats Tomato Cages (Hands Down)
I’ve probably wasted more money on cheap tomato cages over the years than I want to admit. They’re great when the plants are small—but once July hits, forget it. Your plants outgrow them fast, they fall over, and by August, everything’s a tangled mess.
This wire tomato trellis gives me room to train each plant up with twine or clips, keep the air circulation strong, and actually walk down the row without tripping over collapsed cages. Plus, it lets the sun hit every part of the plant, which helps cut down on diseases and gives better fruit all season long.
It’s also easier when it’s time to harvest. I can spot tomatoes faster when they’re supported and spread out. My kids even help pick now, which they wouldn’t do when everything was smashed together in a cage jungle.
And while you’re getting your garden looking tidy, it’s a good time to think about what’s around your veggies too. We planted a few rose of Sharon shrubs along the outer edge of our garden—they bring in pollinators like crazy and look awesome through the summer.
How to Train Tomato Plants on the Wire Trellis
Once your trellis is in place, the real magic starts as your tomato plants grow. About two weeks after planting, I start training them up the wires. I usually use soft garden twine, loop it loosely around the main stem, and tie it to the wire just above where the plant is.
As the tomatoes grow taller, I just keep adding ties or move the twine up to the next wire level. For really vigorous plants, I’ve even run a vertical line from the bottom wire all the way to the top and wound the stem around it as it climbs. It takes a few minutes each week, but it saves you from having to untangle a jungle later.
This setup works whether you’re growing slicing tomatoes, cherries, or paste varieties. We’ve grown them all on this same trellis, and the support is plenty strong. If you’re wondering how to trellis tomatoes without breaking your back, this is the way.
And speaking of strong setups—our Norway spruce trees are built for wind and snow. We’ve planted a few around the edge of the garden to block wind and give a little privacy from the road.
How Long Did This Project Take and What Did It Cost?
This whole tomato trellis project took me less than two hours start to finish. And I didn’t even rush—just paced it out over a Saturday morning with some coffee and my oldest helping. We drove the T-posts in about 18 inches, set the U-posts by hand, and strung the wire in sections.
Cost-wise, I spent roughly:
- $12 per T-post × 2 = $24
- $9 per U-post × 3 = $27
- Two rolls of 14-gauge galvanized wire (200 ft total) = $15
- Twine and extras I already had on hand
So just under $80 total for a sturdy, long-lasting tomato support system. Not bad considering I’ve blown more than that on flimsy cages in one season that didn’t even make it through July.
If you’re planting in rows like we are, this kind of upfront investment saves your back, your plants, and your time. And if you’re still figuring out what trees or shrubs to plant near your veggie space, you can check out some small trees under 25ft that won’t take over your garden but still add beauty or shade.
Can This Trellis Handle a Full Season of Growth?
Absolutely. We’re well into the growing season now, and this DIY tomato trellis is holding up better than anything I’ve ever used. The T-posts on the ends give it all the backbone it needs. They haven’t shifted a bit—even after several storms and a few heavy rains that usually turn our tomato row into a floppy mess.
The wire is staying tight, and since the U-posts have those handy holes, it hasn’t needed adjusting at all. I haven’t had a single post lean or fall, and the tomatoes are climbing like crazy. I just keep tying them off as they grow taller. Honestly, I don’t know why I messed with cages all these years.
If you’re growing your own food like we are, it’s worth investing in structures that last. Same goes for trees—if you’re trying to add something with both function and beauty, our river birch trees thrive in wet conditions and grow fast, making them great to plant near garden areas with poor drainage.

What’s the Best Way to Customize This Setup for Smaller Gardens?
You don’t have to be growing 50 feet of tomatoes to use this system. If you’ve only got a few plants in a raised bed or a short row, just scale it down. One T-post on each end and maybe just one U-post in the middle is all you need for a mini version of this trellis.
You can also adjust the number of wires depending on your space and variety. For determinate tomatoes, two lines might be plenty. For indeterminate types that keep growing all season, three or even four wire lines spaced out every 12–18 inches will give them plenty of support.
And if you’re building this along a fence or at the edge of your property, you might consider planting red twig dogwoods nearby for a pop of winter color that looks great even when the tomatoes are long gone.
Smaller spaces just need smaller adjustments—and this system makes it easy. No drilling, no concrete, no bending metal—just good old-fashioned garden sense with the kind of durability us rural folks appreciate.