When Your Fence Wire Starts Sagging, Here’s What We Do
If you’ve got livestock fencing on your property, you already know the problem. Woven wire doesn’t stay tight forever. Over time it sags, animals lean on it, posts shift a little, and sections that used to be drum-tight start to look sloppy and weak. A loose fence is a fence that’s not doing its job — and on a farm where you’ve got goats, dogs, or other animals, a weak spot in the fence line is a real problem waiting to happen.
We’ve dealt with this plenty of times here at Weaver Family Farms. The traditional fix is to grab a pair of pliers and start twisting the wire to work some tension back into it. It works, but if you’ve ever done a full fence line that way you know it absolutely wrecks your wrist. Twisting with pliers over and over is a repetitive motion that gets painful fast — and we can tell you from experience that it’s especially rough if you’ve had any kind of wrist issues. After dealing with carpal tunnel surgery, going back to the pliers method just wasn’t an option.
So we came up with a better way. It took a short piece of rebar and a drill, and it made the whole job a lot easier on the body without sacrificing results.
What You Need for This Trick
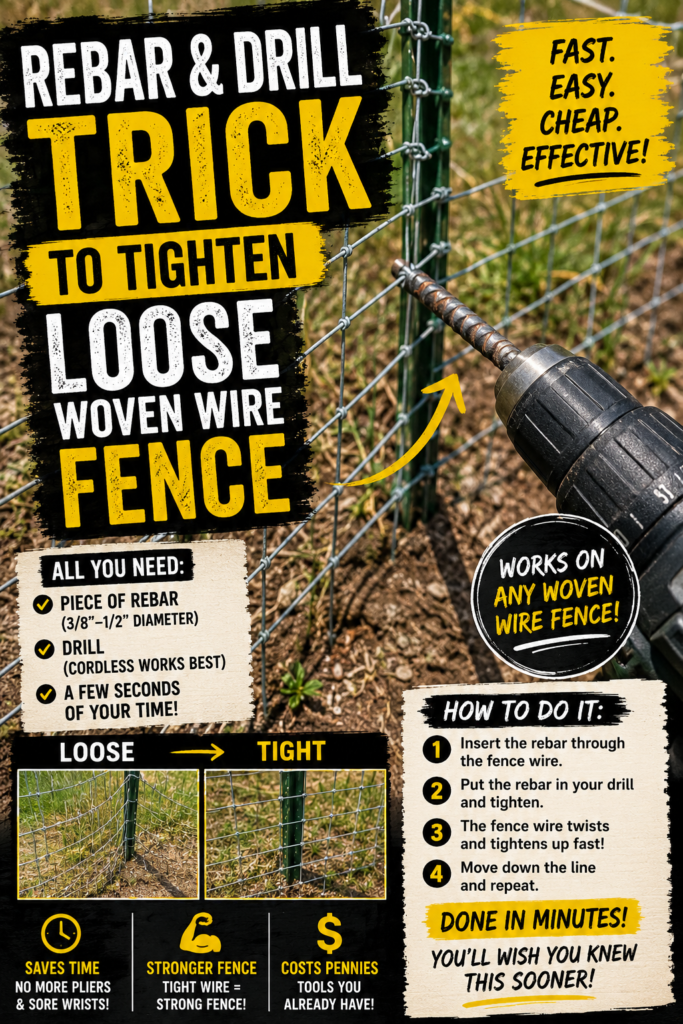
The setup is about as simple as it gets. You need two things:
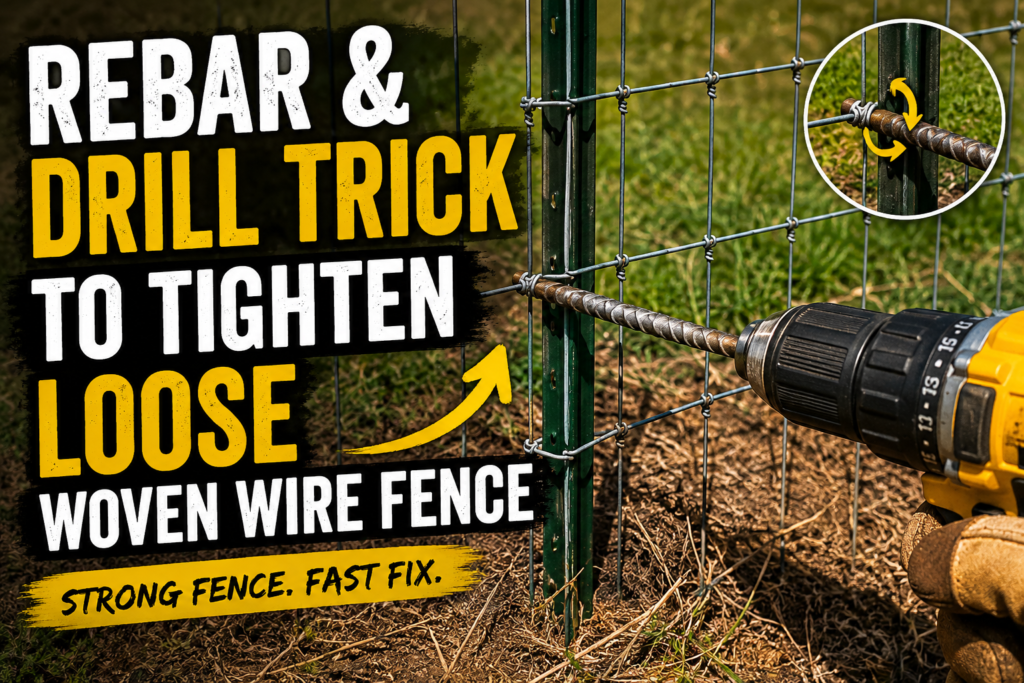
A short piece of rebar. We used a half-inch piece cut down to about six or seven inches long. Nothing special — just a scrap piece of rebar with a slit cut into one end. That slit is the key. It’s what hooks onto the fence wire so you can twist it without the rebar slipping off. A 3/4 inch slit cut into the end is plenty. If you’ve got a grinder or a cut-off wheel, this takes about thirty seconds to make.
A good cordless drill. We used our DeWalt and it worked great for this. The longer body of the drill gives you more leverage than a pair of pliers, and because you’re using your arm to control the motion instead of just your wrist, it takes a lot of the strain off. If you need a solid drill for farm and DIY work, the DEWALT 20V MAX Atomic Brushless 1/2 in. Hammer Drill is what we’d recommend — it’s compact, powerful, and handles jobs like this without any trouble.
That’s it. Two things, both of which you probably already have or can put together in a few minutes.

How the Rebar Drill Trick Works
The concept is straightforward. You chuck the rebar into your drill just like you would a drill bit — the non-slit end goes into the chuck. Tighten it down so it’s secure. Then you take the slit end and hook it onto the horizontal wire of your woven fence that needs tensioning.
From there, you run the drill and let it twist the wire. The slit catches and holds onto the wire as the rebar rotates, putting twist after twist into the wire and pulling the fence tight as it goes. You can feel it tensioning up as you work.
A couple of important things to keep in mind as you do this:
Don’t over-twist. This is especially true if you’re working with welded wire rather than standard woven wire. Welded wire has connection points where individual wires are welded together, and if you put too much twist into it those welds can snap. Go until it’s firm and tight, then back off. You’re not trying to wind it into a spring — just get the sag out and restore some tension.
Use your arm, not your wrist. The beauty of using a drill for this instead of pliers is that the longer body of the drill naturally gets your whole arm involved in the motion. With pliers you’re basically doing wrist curls over and over. With the drill, your arm is doing the work and your wrist is just along for the ride. Much easier to sustain over a longer section of fence.
Keep a hand on the fence. Feel the tension building as you twist. That feedback tells you when you’ve got enough. Once it stops feeling loose and starts feeling firm, you’re done with that spot.
Is This the Correct Way to Tension a Fence?
Honest answer — no, not technically. The right way to tension a new fence is with proper fence stretchers and the correct tools during installation. This trick isn’t a replacement for doing it right from the start.
But here’s the reality: if you’ve already got a fence up and sections of it are going loose, you’re not going to pull the whole thing down and re-stretch it from scratch. You want a practical solution that gets the job done on existing fence, and this is exactly that. It works, it’s fast, it’s easy on your body, and it costs you nothing if you’ve already got rebar scraps and a drill.
We’ve used woven wire livestock fencing throughout our pumpkin patch project — you can read about how we set up that fencing and the goat gate system in our post on building our pumpkin patch from scratch. Keeping that fence tight and functional is exactly the kind of situation where this trick comes in handy.


Why a Good Drill Matters for Farm Work
We use our drill constantly around here. It’s one of those tools that shows up in more jobs than you’d expect — fence work, building projects, repairs, you name it. Having a drill that’s reliable, compact, and has real power makes a difference when you’re out in the field away from the shop.
The DEWALT 20V MAX Atomic Brushless Hammer Drill is built for that kind of use. The brushless motor gives you better efficiency and longer runtime, and the compact design means it’s not awkward to work with in tight spots. For farm and homestead work where your drill is going to see real use in real conditions, it’s worth having something that can take it.
We’ve written about other farm tools and DIY tricks before too — check out our post on using a T-post driver bit to save time and energy on fence building if you’re working on a fence project. Same idea — simple tool modification that makes a tough job a lot more manageable. And if you missed it, we also covered our DIY fix for a sagging gate which goes hand in hand with keeping your whole fence line in good shape.
A Quick Trick Worth Sharing
This one came out of necessity. When your wrists are telling you the old method isn’t working anymore and you’ve still got fence to deal with, you figure out a better way. A piece of scrap rebar, a slit cut in the end, and a drill — that’s all it took.
If you give this a try on your property, watch the video above to see exactly how it’s done. Sometimes seeing the motion makes it click in a way that a written description can’t fully capture. And if you’ve got your own fence tricks or tools you’ve figured out over the years, we’d love to hear about them in the comments.
We’ll keep sharing what’s working for us out here as we go. More farm projects and updates coming soon.