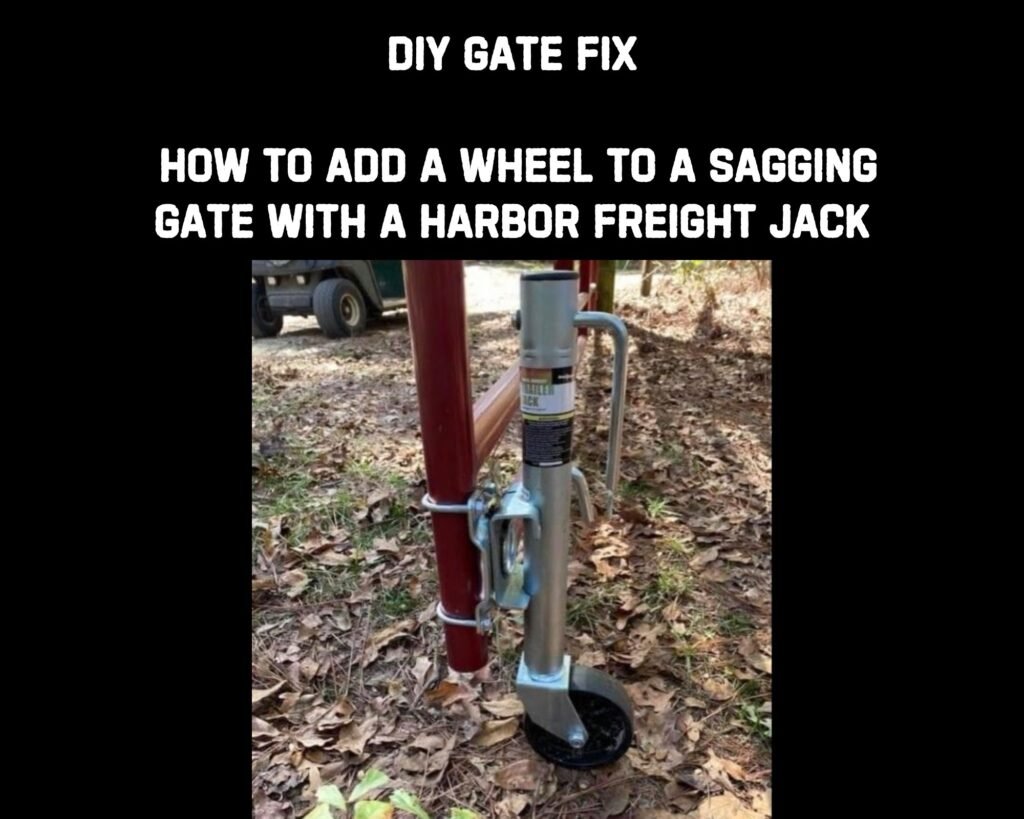
If you’ve ever dealt with a sagging gate, you know how frustrating it can be. Not only does it detract from your home’s curb appeal, but it can also become a functional nuisance, making the gate difficult to open and close. But there’s good news for DIY enthusiasts looking for a simple and effective solution to this common problem. By using a Harbor Freight jack and a couple of u-bolts, you can add a wheel to your sagging gate, providing it with the support it needs to function smoothly again. This budget-friendly fix is not only easy to implement but also adjustable, ensuring your gate stays in top shape for years to come. And for those who might not have a Harbor Freight nearby, don’t worry; a Torin 1000 LBs Capacity Swivel Boat Trailer Jack available on Amazon can serve as an excellent alternative. Let’s dive into how you can lift your sagging gate and restore its former glory with this innovative DIY gate fix.
Understanding Gate Sagging
Before we tackle the solution, it’s crucial to understand why gates begin to sag in the first place. Gate sagging is a common issue that can arise from several factors, impacting both the functionality and aesthetics of your gate. The primary culprits include:
- Weather Conditions: Extreme weather conditions, such as heavy rain, snow, or even prolonged exposure to sunlight, can warp or damage the gate’s material, leading to sagging.
- Wear and Tear: Regular use over time naturally leads to wear and tear. Hinges may become loose, and the gate’s structure might weaken, causing it to sag.
- Improper Installation: If the gate wasn’t properly installed with the right balance or support, it’s more likely to sag sooner rather than later.
- Structural Weaknesses: Gates made from less durable materials or those that lack adequate support structures are more prone to sagging.
Understanding these factors is the first step in addressing and preventing gate sagging. With this knowledge, we can now explore how adding a wheel with the help of a Harbor Freight jack and u-bolts not only fixes the current sagging issue but also helps prevent gate sagging with an adjustable jack in the future, ensuring your gate remains functional and visually appealing for a long time.
Materials and Tools Needed
To embark on this DIY project and give your sagging gate the lift it needs, you’ll require a few key materials and tools. Here’s what you’ll need:
- Harbor Freight Jack with Wheel: This will serve as the main component of our fix, providing the adjustable support your gate needs. For those without access to a Harbor Freight, the Torin 1000 LBs Capacity Swivel Boat Trailer Jack is a fantastic alternative that’s easily available online.
- U-Bolts: These will be used to securely attach the jack to your gate, ensuring it stays in place and provides consistent support.
- Basic Hand Tools: Depending on your gate’s current setup, you might need a set of wrenches, pliers, and possibly a drill to make holes for the u-bolts.
With these materials at hand, you’re well on your way to fixing that troublesome sagging gate. But this project is about more than just a quick fix; it’s about enhancing your overall homesteading experience.


Step-by-Step Guide to Adding a Wheel to Your Gate
Now that you’ve gathered your materials, it’s time to tackle the sagging gate issue head-on. Here’s a detailed, step-by-step guide to installing the wheel using the Harbor Freight jack and u-bolts, ensuring your gate gets the support it needs:
- Assess Your Gate: Before starting, take a good look at your gate to determine the best spot for the wheel. Ideally, you want it near the latch side, where sagging typically occurs.
- Prepare the Jack: If you’re using the Torin 1000 LBs Capacity Swivel Boat Trailer Jack, make sure it’s adjusted to the right height for your gate. Remember, the goal is to lift the sagging part of the gate to align with the rest of the fence.
- Attach the U-Bolts: Position the jack where you plan to install it on the gate. Mark the spots where the u-bolts will go, ensuring they’re evenly spaced and aligned. Drill holes if necessary, then secure the jack to the gate with the u-bolts, tightening them firmly to prevent any movement.
- Adjust the Jack: With the jack securely in place, use its adjustable feature to raise the sagging part of the gate until it’s level with the rest of the fence. This might require some trial and error to get just right.
- Remove the Handle (Optional): To prevent tampering and ensure the jack stays in its adjusted position, consider removing the handle. This step is optional but can provide extra security and peace of mind.
- Test Your Gate: Once everything is tightened and adjusted, give your gate a test swing. It should open and close smoothly, without dragging on the ground or sagging.
Congratulations! You’ve successfully added a wheel to your sagging gate, providing it with the support it needs to function properly. This DIY fix not only saves you the hassle and expense of a more extensive repair but also extends the life of your gate.
For those who enjoy tackling projects around the homestead and are always looking for ways to improve efficiency and sustainability, diving into resources like The Ultimate Guide to Backyard Homesteading can offer a wealth of information and inspiration. Whether you’re new to homesteading or a seasoned pro, there’s always something new to learn and implement on your land.
Maintenance and Adjustments
After successfully installing a wheel on your sagging gate, it’s important to consider the long-term maintenance and potential adjustments needed to keep it functioning smoothly. Here’s how to ensure your gate continues to serve you well:
- Regular Checks: Periodically inspect the wheel, jack, and u-bolts for any signs of wear or loosening. The changing seasons and weather conditions can affect even the sturdiest materials, so it’s wise to stay ahead of any maintenance needs.
- Lubrication: To keep the wheel turning smoothly and to prevent rust on the jack and u-bolts, apply a suitable lubricant regularly. This simple step can significantly extend the life of your gate fix.
- Adjustment: Over time, your gate may require re-adjustment due to settling or further sagging. Thanks to the adjustable nature of the Harbor Freight jack or the Torin 1000 LBs Capacity Swivel Boat Trailer Jack, you can easily raise or lower the wheel to accommodate these changes. Remember, the goal is to maintain alignment with the rest of the fence for optimal functionality.
- Handle Removal Reconsideration: If you initially chose to remove the handle to prevent tampering, keep it in a safe place. You may need it for future adjustments, especially as you perform regular maintenance or if you need to move the wheel for any reason.
- Seasonal Preparations: Depending on your climate, preparing your gate for winter or rainy seasons might involve additional steps. Ensuring that the area around the wheel is clear of debris, snow, or water can prevent unexpected issues.
By following these maintenance and adjustment tips, you can enjoy a smoothly functioning gate