If you’ve owned a wood fence for very long, you’ve probably walked outside one day and thought, “That definitely wasn’t leaning yesterday.”
That’s exactly what happened to me.
Well…maybe not yesterday.
I’d actually been noticing this section of our fence leaning a little more every year, and I finally decided it was time to do something about it before it became a much bigger problem.
This particular fence is part of our dog yard here at Weaver Family Farms. We raise puppies, so having a sturdy fence isn’t just about appearance. It’s something we rely on every single day.
I also knew I didn’t want to tear the whole fence apart just because several of the 4×4 posts had started leaning.
There had to be a better solution.
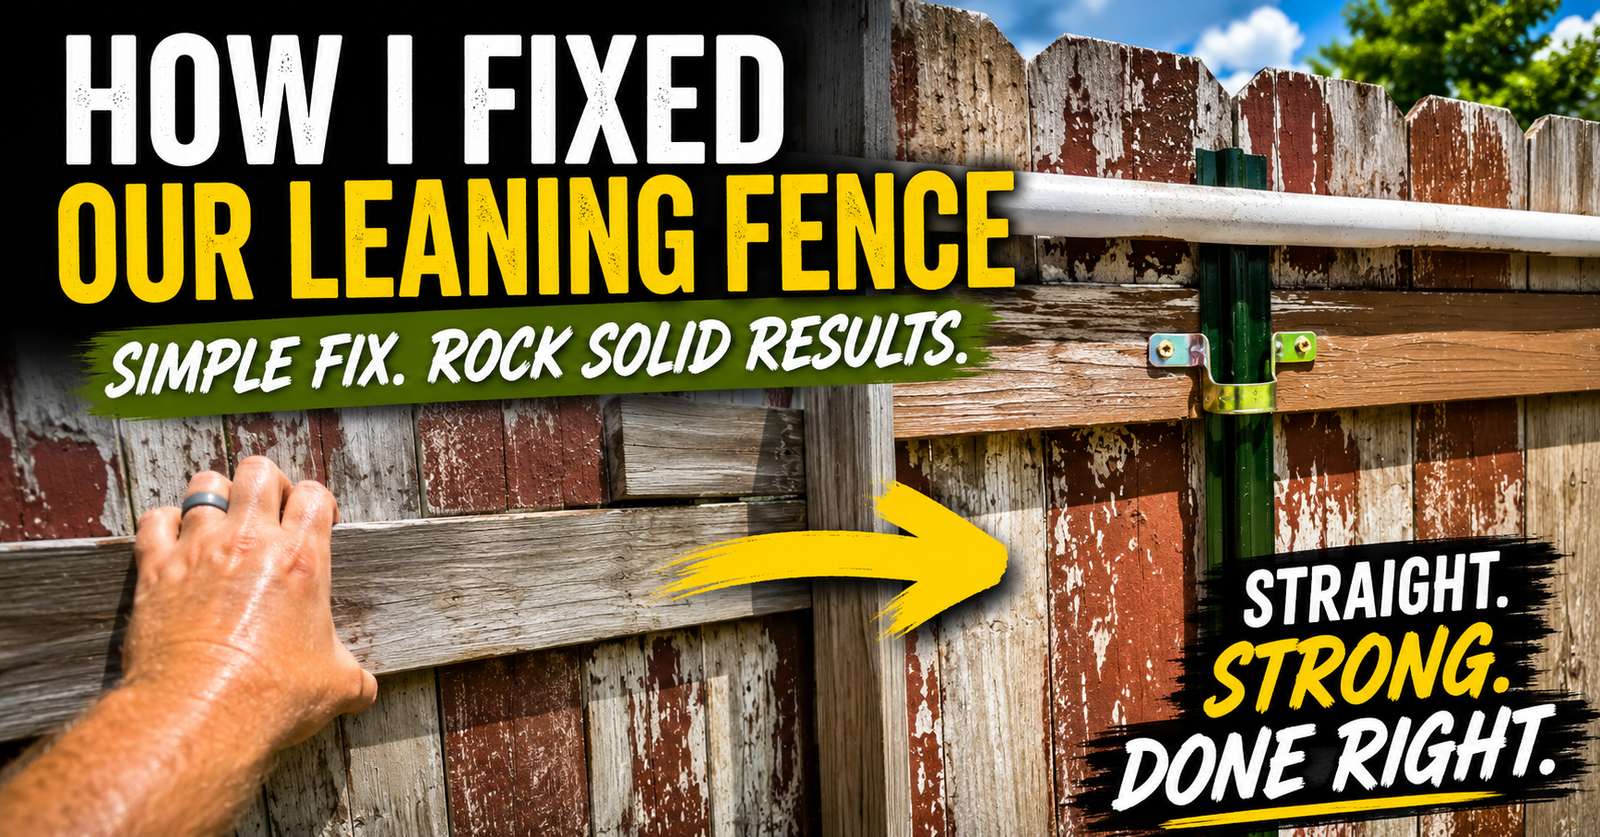
After looking things over, I decided to straighten the fence using our mini excavator and permanently reinforce it with steel T-posts attached directly to the wooden framework.
It ended up working even better than I expected.
If you’re dealing with a leaning privacy fence, dog fence, livestock fence, or any other wooden fence, here’s exactly how I fixed ours without digging up every post and starting over.
Don’t forget to watch the full video in this post. It shows every step of the repair from beginning to end.
Why Our Fence Started Leaning
This fence has been standing for around three years.
Overall, it’s held up really well.
The biggest issue wasn’t the lumber.
It wasn’t the fasteners.
It wasn’t even the fencing.
The problem was simply the 4×4 posts beginning to lean over time.
One question I know some people are going to ask is why I didn’t set every post in concrete when I built the fence.
The answer is actually pretty simple.
I chose not to.
I’ve replaced enough old fence posts over the years to know that concrete often creates another problem down the road.
Eventually, every treated post reaches the end of its life.
When that day comes, I’d much rather pull out a post by itself than wrestle with a giant chunk of concrete buried in the ground.
Concrete certainly has its place, and plenty of people swear by it.
For me, I liked the idea of making future repairs easier.
Instead of pouring concrete, I decided I’d rather reinforce the fence another way if it ever started moving.
That day finally came.
Before Replacing Fence Posts, Look for Another Option
The first thing many homeowners think is…
“I guess I’m replacing fence posts this weekend.”
That may be true if your posts have completely rotted off.
Mine hadn’t.
The posts themselves were still solid.
They were simply leaning.
That’s a huge difference.
If the wood is still in good condition, sometimes all you need to do is get everything back into position and add enough reinforcement to keep it there.
That was my goal from the beginning.
Instead of replacing perfectly usable lumber, I wanted to strengthen what was already there.
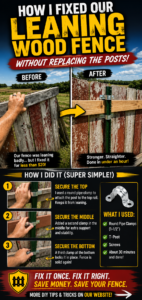
Straightening the Fence With Our Mini Excavator
This was honestly one of the easiest parts of the entire project.
Once I figured out exactly where I wanted to push, I climbed into our mini excavator and carefully used the bucket against the upper horizontal brace.
The key word here is carefully.
I wasn’t trying to shove the fence over.
I was simply applying slow, steady pressure until the leaning section started moving back toward where it originally belonged.
Little by little, the fence became straighter.
I knew I’d probably scratch a little paint off the bucket.
That didn’t bother me.
The goal was getting the fence back into position before adding permanent reinforcement.
If you’ve watched some of my other equipment projects, you’ve probably seen this same excavator before. I also used it while digging a 50-foot water line trench around our farm, and it’s become one of the most useful pieces of equipment we’ve ever purchased.
The Real Secret Was Reinforcing It With T-Posts
Once I had the fence mostly straight, I knew it wouldn’t stay that way on its own.
That’s where the T-posts came in.
Instead of depending entirely on the original wooden posts, I drove heavy steel T-posts directly behind the fence.
Once they were in the ground, they essentially became new supports for the fence.
Steel T-posts are incredibly durable.
They’re inexpensive.
They’re easy to install.
Most importantly, they aren’t going anywhere anytime soon.
By transferring much of the load onto the steel posts, the wooden fence suddenly became much more stable.
Looking back, if I’d installed these while originally building the fence, I probably wouldn’t have had nearly as much leaning develop over the years.
That’s actually one of the reasons I added T-posts while building my 10×75 predator-proof chicken run. They’re affordable insurance that can save a lot of headaches later.

Driving T-Posts Beside an Existing Fence Takes Some Patience
Putting T-posts into open ground is pretty straightforward.
Installing them inches away from an existing fence…
That’s a different story.
Your T-post driver doesn’t have much room to swing.
You’re working around the fence rails.
You’re trying not to damage anything you’ve already built.
It’s definitely doable.
You just have to take your time.
I ended up using 7-foot T-posts.
Could I have used 8-foot posts?
Sure.
But once you move into 8-foot T-posts, the price starts climbing quite a bit.
For this repair, I felt the 7-foot posts were more than enough.
I drove them until the anchor plate was securely below ground.
Were they as deep as they could possibly go?
No.
But they were plenty deep for what I needed, especially since I installed multiple posts along the leaning section.
If you’re going to be driving a lot of T-posts around your property, I highly recommend checking out the T-post driver attachment that’s saved me countless hours on fencing projects. It’s one of those tools that quickly pays for itself.
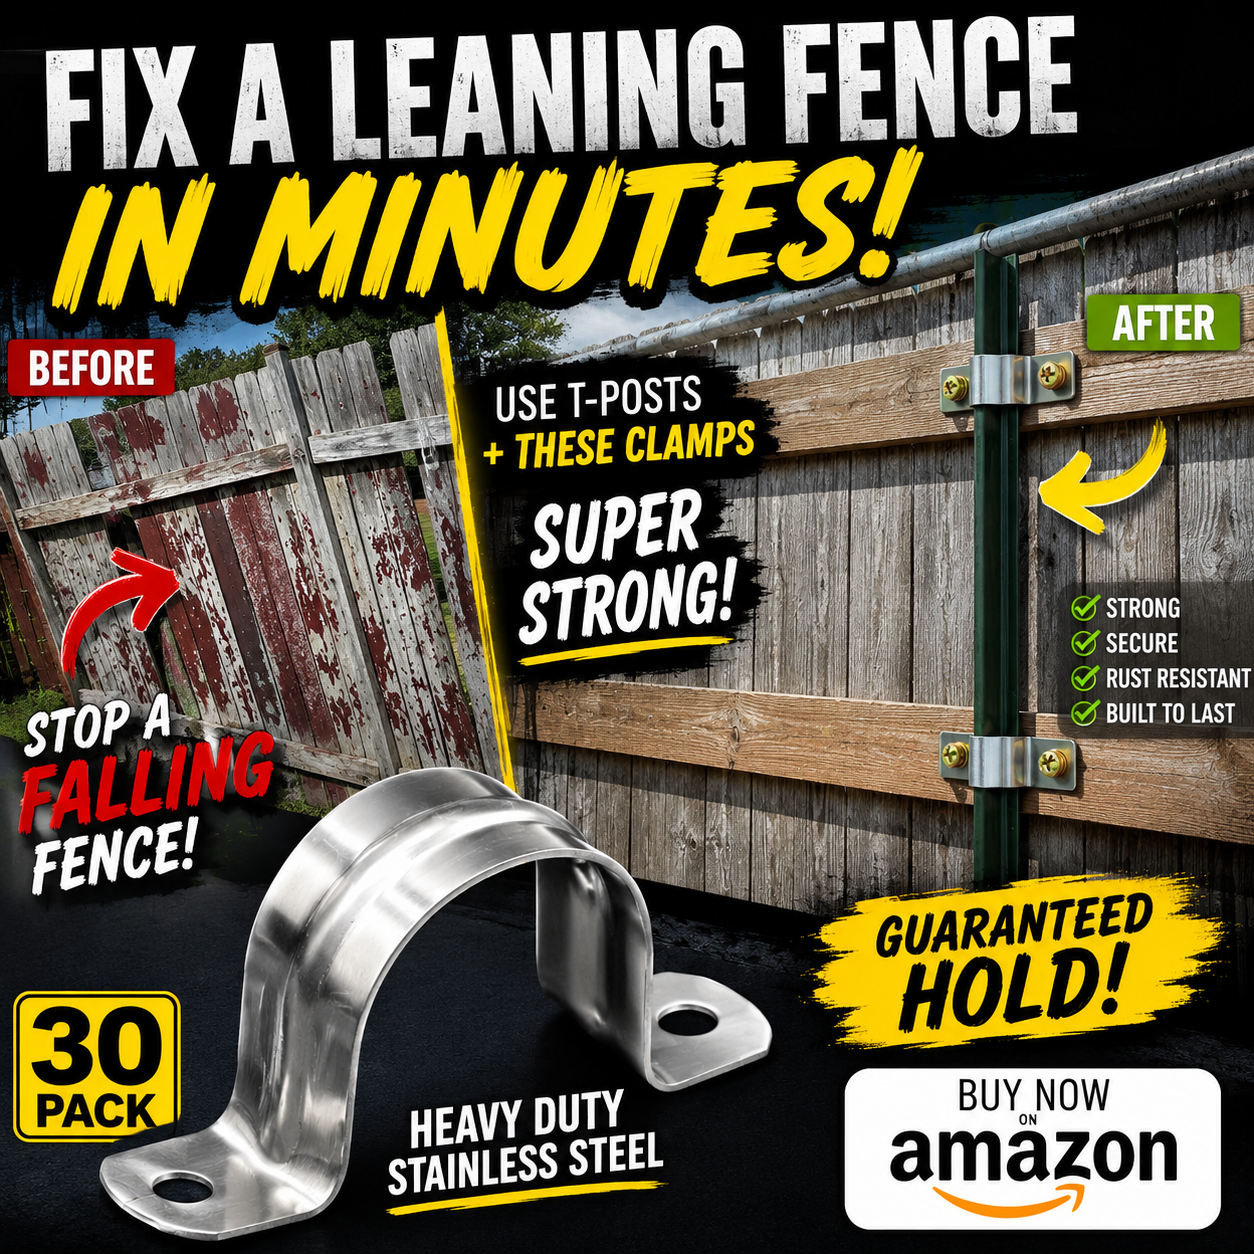
Stainless Steel Pipe Straps Made This Repair Easy
This is probably the simplest part of the repair, but it’s also what ties everything together.
After driving each T-post, I attached it directly to the horizontal 2×4 fence rails using heavy-duty stainless steel pipe straps.
I bought the 1½-inch size, and they fit almost perfectly around standard T-posts.
All it took was a couple of screws through each strap into the wooden rail.
Once tightened down, the T-post and fence basically became one solid structure.
Simple.
Strong.
Inexpensive.
Sometimes the best repair isn’t the fanciest one.
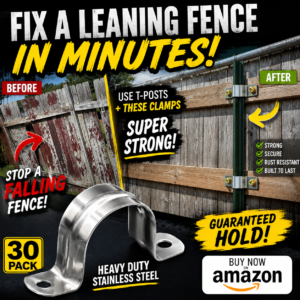
If you’re planning on making this same repair, these are the exact 1½-inch stainless steel pipe straps I used on my fence.
They worked great, and I’d buy them again without hesitation.
I Didn’t Feel the Need to Strap Every Board
One thing I noticed while making the repair was that you really don’t have to overdo it.
I mainly attached the T-posts near the upper and middle horizontal rails.
That’s where most of the force was being transferred.
Could I have added another strap near the bottom?
Sure.
But after everything tightened up, I honestly didn’t think it was necessary.
The fence already felt dramatically stronger.
Sometimes knowing when to stop is just as important as knowing what to add.


Five T-Posts Were All It Took
By the time I finished, I had installed five T-posts along the section that was leaning the worst.
Instead of trying to make one post do all the work, I spread the support across several posts.
That helps distribute the pressure instead of concentrating it in one location.
When I finally climbed off the excavator and stepped back to look at everything, I could immediately tell the difference.
The fence wasn’t absolutely laser straight.
Honestly, I wasn’t expecting it to be.
This wasn’t about making it look like a brand-new subdivision fence.
It was about making it strong again.
Mission accomplished.
Why I Think This Repair Will Last a Long Time
One of the reasons I really like this repair is because the steel T-posts are now doing a lot of the work instead of relying completely on the original 4×4 posts.
Pressure from the fence is now shared between wood and steel.
That gives me a lot more confidence that it won’t continue leaning every year.
T-posts also hold up incredibly well outdoors.
They’ll eventually rust over many, many years, but compared to untreated wood sitting in damp soil, they’re built for the long haul.
Realistically, I doubt I’ll ever have to worry about replacing the T-posts.

One Unexpected Benefit I Thought About Later
After finishing the project, another advantage crossed my mind.
Eventually, every wooden fence reaches the point where some posts need replacing.
Now, whenever that day comes, these T-posts will already be supporting much of the fence.
Instead of trying to keep everything from falling over while replacing a single 4×4, I’ll already have solid steel reinforcement holding things in place.
Replacing individual posts should actually be much easier than it would’ve been before.
Sometimes the best repairs also make future repairs easier.
Would I Still Skip Concrete?
I know this is probably the most debated part of the entire project.
Some people put concrete around every fence post.
Others don’t.
I’m not saying either approach is wrong.
I’m simply explaining why I built ours the way I did.
Personally, I still like not having concrete around my wooden posts.
If I eventually need to replace one, I can simply remove the post without digging out a giant concrete footing.
Now that I’ve reinforced everything with T-posts, I honestly like the setup even better.
Everyone builds differently, and that’s perfectly fine.
This method has worked well for me, and I’ll probably continue using it on future fencing projects around our farm.


This Works for More Than Just Dog Fences
Although I repaired this fence because it’s part of our dog yard, this same idea can work in a lot of different situations.
I’ve seen similar repairs used on:
- Backyard privacy fences.
- Garden fences.
- Livestock fencing.
- Goat pens.
- Small pasture fencing.
- Chicken yards.
- Orchard fencing.
As long as the fence itself is still structurally sound and the posts haven’t completely rotted away, reinforcing with steel T-posts can often buy you many more years before a complete rebuild becomes necessary.
What I’d Do Differently Next Time
Like every project around the farm, I learned a few things.
If I were building this fence again from scratch today, I’d probably install T-posts during the original construction instead of waiting until later.
It would’ve been much easier.
You have plenty of room to drive them.
You’re not working around an existing fence.
Everything lines up more easily.
That doesn’t mean adding them later is difficult.
It just takes a little more patience.
That’s exactly what I did while building my covered chicken run. Incorporating the steel supports during construction made the whole project go much smoother.


A Few Tips Before You Try This Yourself
If you’re thinking about repairing your own leaning fence this way, here are a few things I’d recommend.
Take your time straightening the fence before driving any T-posts.
Drive the posts as deep as practical for your soil conditions.
Use galvanized or stainless hardware so it lasts outdoors.
Don’t try to force a severely rotted fence back into place. This repair works best when the wood is still solid and the problem is simply leaning posts.
Finally, don’t obsess over making the fence perfectly straight. A sturdy fence that’s off by half an inch is a whole lot better than a perfectly straight fence that’s getting ready to fall over.
Frequently Asked Questions
Can you fix a leaning fence without replacing the posts?
Yes, if the posts are still structurally sound. In my case, the wood was still in good shape. The posts had simply leaned over time, so reinforcing them with steel T-posts solved the problem without tearing the fence apart.
How deep should a T-post be driven?
It depends on your soil, but I made sure the anchor plate was well below the surface. Even though my posts weren’t buried as deep as an 8-foot T-post could be, they were more than sufficient for this repair because several were installed along the fence.
Why didn’t you use 8-foot T-posts?
Mostly because of cost. The price jumps quite a bit when you move up to 8-foot posts. For what I was trying to accomplish, the 7-foot posts worked just fine.
Can I straighten a fence with a tractor instead of an excavator?
Possibly. The important part is applying slow, controlled pressure without damaging the fence. I used our mini excavator because it gave me excellent control while pushing the fence back into position.
Will this repair work forever?
Nothing lasts forever, but I’m confident this repair added many years to the life of our fence. The T-posts now provide reinforcement that simply wasn’t there before.
About the Author
Daxon Weaver is the owner of Weaver Family Farms, a small first-generation family farm on 4 acres in rural Missouri. Along with his family, he raises puppies, grows fruits and vegetables, operates a licensed nursery, and enjoys building practical DIY projects that make everyday life on the farm a little easier.
From fencing and equipment modifications to gardening, orchards, chickens, and homesteading projects, Daxon shares real-world experiences from jobs he’s personally completed. Every article is based on firsthand experience with the hope that it helps someone else tackle a similar project with a little more confidence.
Whether it’s building something new or figuring out how to make something old last a few more years, there’s a lot of satisfaction in solving problems yourself. That’s one of the things I enjoy most about life on our little farm, and it’s exactly why I enjoy sharing projects like this with all of you. I hope this repair gives you another option to consider before you decide to tear out an entire fence and start over. Happy building, and thanks for following along with our projects here at Weaver Family Farms.