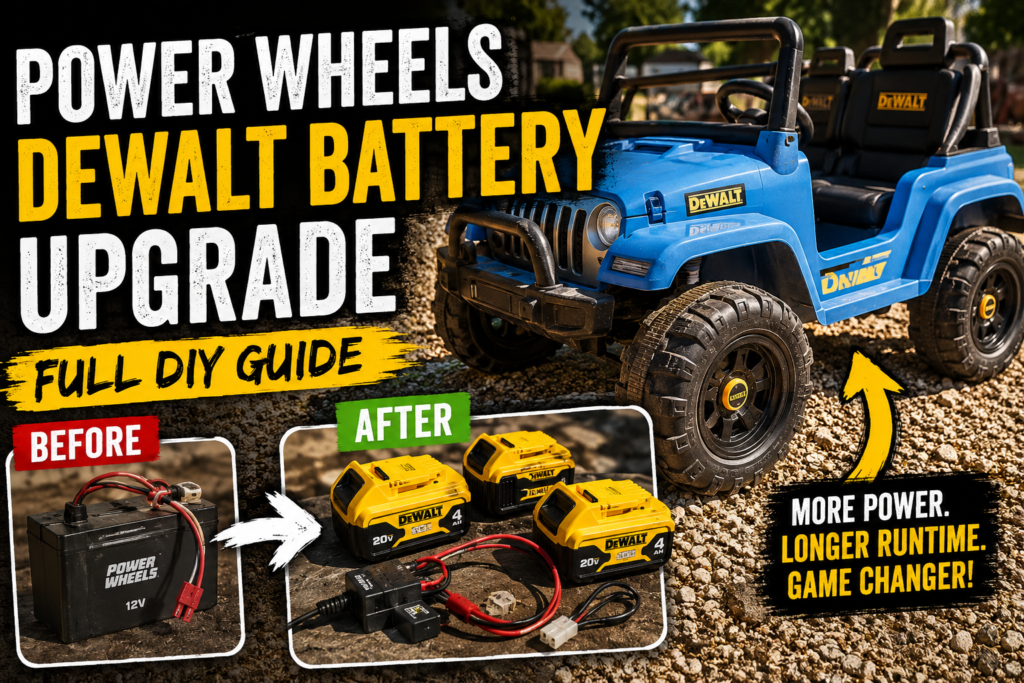
Why We Decided to Upgrade the Power Wheels Battery
If you’ve got a kid with a Power Wheels or any kind of ride-on toy, you already know the pain. The stock batteries that come with these things are expensive to replace, heavy, slow to charge, and they don’t last very long before they start losing their punch. A replacement Fisher-Price battery can run you sixty dollars or more, and after a season or two of hard use you’re right back in the same boat — weak power, slow speeds, and a kid who’s frustrated because his four-wheeler barely moves.
We had a Fisher-Price Power Wheels four-wheeler here for our son, and it was getting to that point. Rather than throw money at another stock battery that would give us the same results, we decided to do something different. We already run DeWalt 20V batteries on every tool we own — drills, saws, the whole lineup. Those batteries are powerful, they hold a charge well, and we’ve already got several of them. The idea of tapping into that same battery ecosystem for the Power Wheels made a lot of sense.
So we did it. Here’s exactly how the whole conversion went — what parts we used, how we wired everything together, and what you need to know if you want to do this yourself.


What You Need for This Conversion
Before we get into the how, here’s the parts list. You don’t need a ton of stuff for this but each piece matters, so don’t skip anything.
A DeWalt 20V battery adapter with low voltage protection. This is the key piece that makes the whole thing work. The adapter connects your DeWalt tool battery to the Power Wheels wiring and — crucially — it includes low voltage protection so the battery shuts off before it drains all the way to zero. That last part really matters. DeWalt 20V lithium batteries that get drained completely dead can be damaged to the point where they won’t take a charge anymore. You’d basically be throwing the battery away. The low voltage protection Power Wheels battery adapter for DeWalt 20V we used handles all of that automatically and also has an on/off switch built in, which is handy.
A PWM motor speed controller. The stock Power Wheels runs on 12V. A DeWalt 20V battery outputs around 20 volts fully charged. If you just wired that straight to the motor it would burn the motor out fast. The PWM (pulse width modulation) speed controller steps the power delivery down and lets you dial in the right speed for the motor. It gives you control over how fast the vehicle runs so you can tune it to whatever’s appropriate. We used the RioRand 7-70V PWM DC Motor Speed Controller — it runs cool thanks to the aluminum housing, handles up to 30 amps, and comes with an extra fuse included which is a nice touch.
Wire connectors. You’re going to be making several connections throughout this build and you want them to be solid. We used lever-style wire connectors which are far easier to work with than traditional wire nuts — you just push the wire in, flip the lever, and it’s locked. No twisting, no worrying about it coming loose. These lever wire connector assortment packs give you a mix of 2-port, 3-port, and 5-port connectors so you’ve got options for every connection in the build.
14 gauge electrical wire. You’ll need both red and black wire to run new leads between your components. We picked up a pack of 14 AWG red and black electrical wire — 30 feet of each color — which gave us plenty to work with and kept the wiring color-coded throughout the build so there was no confusion about which wire was positive and which was negative.
A wire stripper and needle nose pliers. Basic tools you probably already have. You’ll need them to prep your wires for the connections.
An inline fuse. Protection for the motor and wiring in case something goes wrong. The RioRand controller comes with one but having a fuse cable on hand is good practice for any electrical build like this.
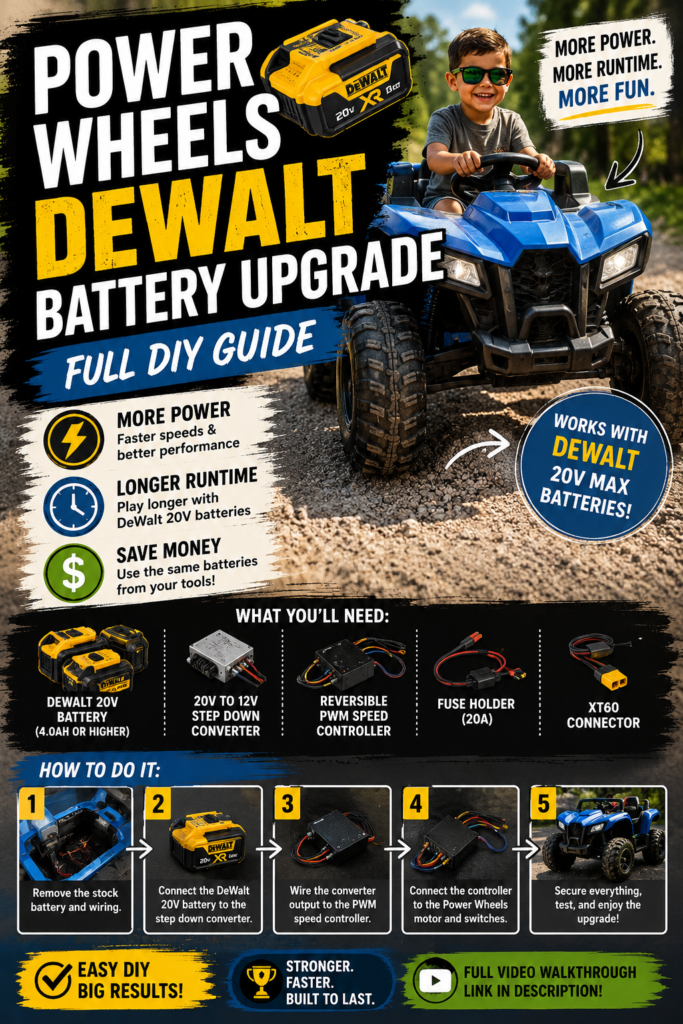
How the Wiring Works — Step by Step
The wiring on this build isn’t complicated but you do need to follow it carefully. Here’s how we did it.
Step 1: Cut the old battery connector off. The Power Wheels has a connector that plugged into the original battery. Cut that off and strip the ends of those wires — you’ll be connecting them into your new setup. The wires coming from the Power Wheels motor are what you’re working with here. On ours the white wire was the motor output positive and the black was the negative from the motor, though it’s worth confirming on your specific model since labeling can be hard to see.
Step 2: Connect the motor wires to the PWM speed controller. The speed controller has labeled terminals for motor output. Connect your white (positive) motor wire to the positive motor output terminal and the black (negative) to the negative motor output terminal. The controller is not always clearly labeled from the factory — on ours, the negative side was on the right and the positive on the left, but look carefully at yours before connecting.
Step 3: Run new wire from the controller to the battery adapter. You’ll need to run a red wire from the positive input terminal on the controller back to the positive output on your DeWalt battery adapter. Then run a black wire from the negative input on the controller back to the negative on the adapter. This is where your extra red and black wire comes in.
Step 4: Install the inline fuse. Put your fuse inline on the positive wire running from the battery adapter to the controller. This protects the whole circuit. We ran ours right at the connection point so it’s easy to access if a fuse ever needs to be replaced.
Step 5: Use lever connectors for all your joins. Anywhere you need to join two or more wires together, use the lever connectors. Push the stripped wire end in, flip the lever down to lock it, done. Much cleaner and more reliable than wire nuts for this kind of build.
Step 6: Hook up the DeWalt battery adapter. The adapter has the connector that your DeWalt battery slides right into — same as clicking a battery onto your drill. Slide your battery in and the adapter’s on/off switch gives you control over whether power is flowing. The display on the adapter reads out the voltage so you can see what your battery is at — when we hooked ours up it showed 20.2 volts on a charged battery.
Step 7: Set the speed controller. Before you put your kid in the seat, dial the PWM controller down. You don’t want it running at full power right out of the gate. Start low, test the speed, and adjust from there. The controller knob lets you tune the speed to exactly where you want it. We set ours to a level that felt safe and appropriate for our son’s age and then had him test it out.
One Thing to Know About the On/Off Switch
The DeWalt battery adapter we used has a built-in on/off switch. You can also wire an additional switch into the circuit if you want a separate kill switch that’s easier for the kid to reach. That said — if you add a second switch on top of the one already on the battery holder, you’ve now got two switches that both have to be in the right position for the vehicle to run, which can get confusing for a young kid. We’re leaving ours with just the adapter switch for now and seeing how that goes before adding anything else.


Why the Low Voltage Protection Matters
We mentioned this above but it’s worth emphasizing again because it can save you a real headache. DeWalt 20V lithium batteries — and really any lithium battery — do not like being fully discharged. When a lithium battery gets drained all the way to zero and sits there, it can fall below a threshold where the charger won’t recognize it anymore. At that point the battery is essentially dead and you’d have to either jump-start it with another battery or accept the loss.
The adapter with low voltage protection cuts power off automatically before the battery reaches that danger zone. It keeps the battery healthy and your kid riding. Without that protection you’d be risking your expensive DeWalt batteries every time the ride-on ran until it died. Don’t skip it.
How It Turned Out
Once everything was wired up and the speed was dialed in, we put our son in the seat and let him try it out. It works great. The DeWalt battery gives it noticeably better response than the old stock battery, it’s lighter than the original lead-acid battery, and when it runs low we just pop it off and swap in another charged DeWalt battery from the shop — same ones we use in all our tools. No waiting around for a slow charging cycle on a heavy proprietary battery.
The speed controller gives us the ability to adjust things as he gets older and more comfortable handling more speed. For now it’s set conservatively, but it’s nice to know the option is there.
This is the kind of DIY project that sounds more complicated than it really is. If you’re comfortable stripping wires and making basic electrical connections, this is totally doable in an afternoon. Watch the video above to see the full build in real time — sometimes seeing the actual wiring makes it a lot easier to follow than reading about it.
Other DIY Projects Around the Farm
We do a lot of this kind of practical DIY work around Weaver Family Farms. If you liked this one, check out our post on the rebar and drill trick for tightening loose woven wire fence — same idea, simple solution to a real problem using tools you’ve probably already got. We also put together a full write-up on how we built a custom utility bed on our Club Car golf cart with no kit, and our DIY sprayer cart for our 15-gallon spot sprayer is another one worth checking out if you’re into farm utility builds.
We’re always working on something around here and we share it all on the blog and YouTube as we go. More coming soon.